
Our middle daughter just graduated to her big girl bed. She’s sleeping in it tonight for the first time and so far we haven’t heard a peep so I think she likes it! After looking around at cheap twin bed frames that were either boring or particle board or both, we decided to make our own out of wood pallets. I’ve seen a lot of projects like this floating around the internet but the one that inspired me the most was the pallet bed that Ashley from Under the Sycamore made a few years ago. It’s beautiful —> http://ashleyannphotography.com/blog/2009/06/29/diy-pallet-reading-bed-for-the-nursery/
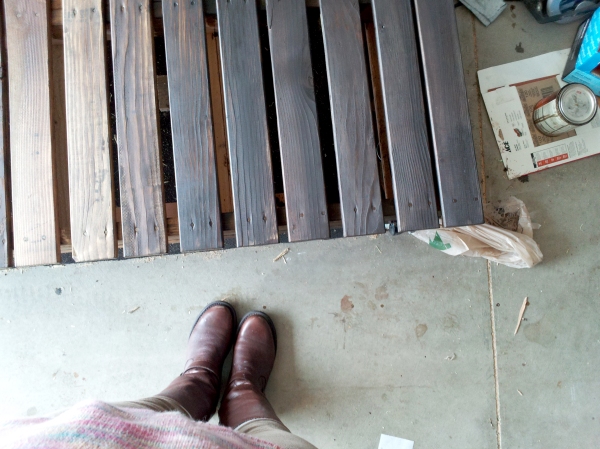
So the first task to tackle for us was to FIND pallets. I really hoped we could find some pallets made with bare wood that hadn’t been treated with any chemicals. We also wanted sturdy pallets that hadn’t been beaten up by whatever they had been created to carry. So we went on a hunt to Home Depot. I love Home Depot. But this was not something that our local Home Depot guys had ever heard of. We got several looks of disbelief and had to talk to several different associates before we were able to communicate that yes, we did want to buy a pallet. Yes, we know what a pallet is. No, we don’t want to rent it…we want to own it…for, like, forever. Apparently, it’s not standard procedure to sell pallets at Home Depot. So make sure you talk to your friendly sales associates before you head out on your search. I think they sold them to us just because they were tired of talking to us about them. We got each pallet for $15. You never know if you don’t ask, right? ;)
We brought them home and laid them side by side. We decided to cut the extra lengths of the support boards off on what would be the bottom of the bed so that they were flush with the studs.
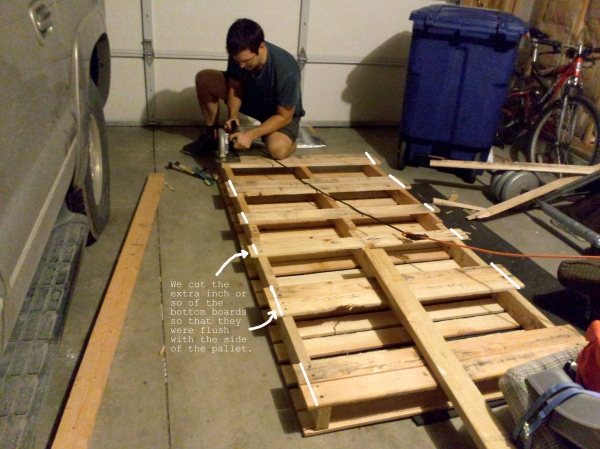

Then we attached our studs. We used 2x4s. One attached to each side of the pallets so that there were two studs extending the length of the bed. We also put one down the center so that the bed is really solid – we’re assuming that at some point our toddler will jump on her bed. :)

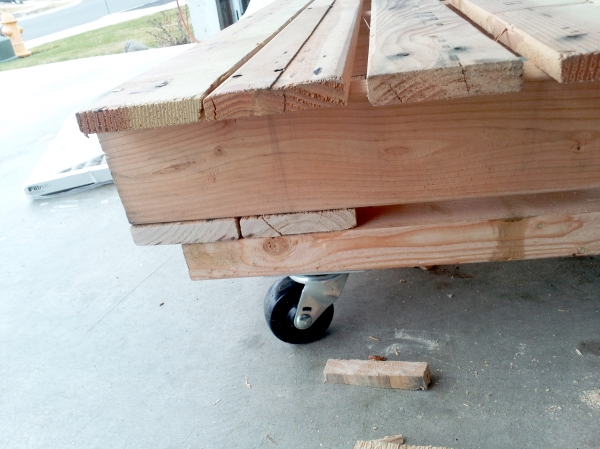
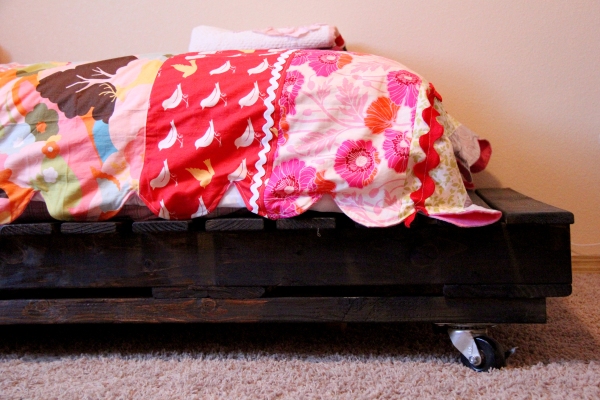
After the studs were on, we were able to flip the bed upright. We looked at several different options to use for legs on the bed but I really liked the unique look that Ashley’s bed had with the wheels she used. We were REALLY glad we used the wheels this afternoon when we moved this sucker from the garage to the house. It’s a sturdy, heavy thing and it was pretty awesome to be able to roll it halfway there!
I thought about leaving the bed raw but I thought it would be fun to use some stain we already had…I’m kind of in love with the way it brought out the wood grain along with the labels on the pallet.
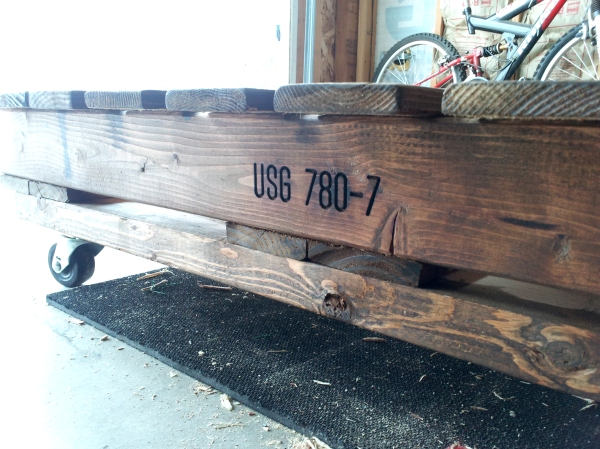
I ended up putting two coats of stain on because the first coat was a little uneven in spots …I’m a novice wood stainer ;) But the finished look still has plenty of the wood grain showing through.
We let the stain dry for a day or so – I think you’re supposed to let it dry for 24 hours but we’ve got a lot going on so it was a few days before we added the polyurethane coat on. I wanted to seal the stain but not have the bed be super shiny so we used a satin finish and I just brushed on a very thin coat.
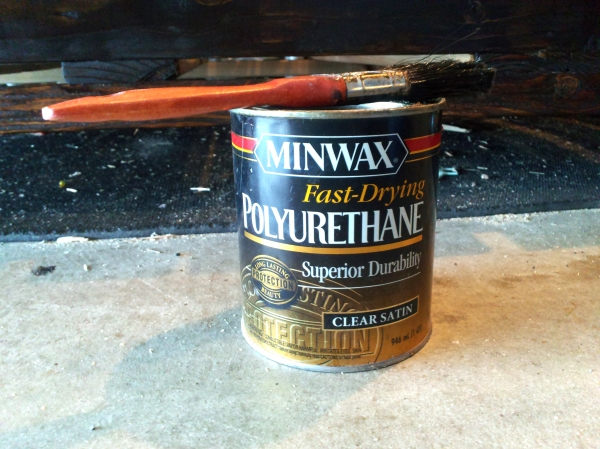
Below is when the Polyurethane is still drying – it didn’t end up quite as shiny as this but it brought out the wood grain even more and just made it look rich.

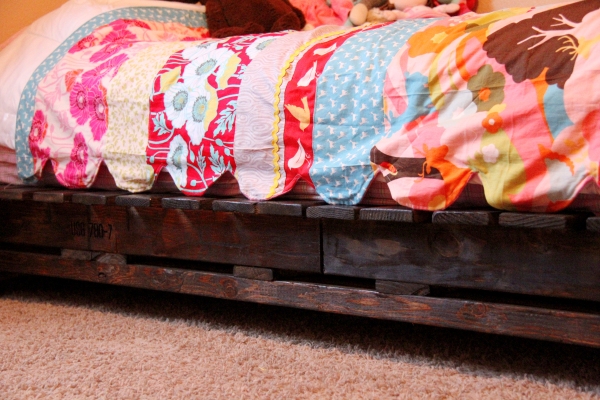
I love the final product. It adds a little roughness and country to her girlie girl room and that’s perfect for who she is. She’s a spunky kid. *Please* ignore my threads that need to be cut – details like those often go unnoticed when you’ve got holiday preparations in full swing along with 3 small kids bopping around.

To finish the big girl bed, I made her a quilt based on one I’ve seen around Pinterest but I wasn’t able to find again. It was VERY easy because it doesn’t require a pattern, just horizontal strips of fabric. I added some scrap flowers to a seam I didn’t like looking at on one of the bigger prints. And the word “love” with some spare ric rac I had in my scraps box. Have you seen the Oh Deer! fabric line from Moda? I LOVE it. Love love it. I got all of my fabric (there’s some gorgeous prints from Joel Dewberry’s Notting Hill collection in there too!) from FatQuarterShop.com. I love getting fabric from their site because I don’t have to take the girls into a store and browse – that’s STRESSFUL! :) Plus Fat Quarter Shop has SUCH an amazing selection.

I scalloped the edges of the quilt because I knew we would only have a mattress on the bed (without a box spring) and I thought it would be cute. Those scallops were kind of a pain…I’m sure there’s a better, more “correct” way to sew them, but I had one day to get the thing finished in between all our Christmas prep so I did what worked…I probably wouldn’t do it again, except it IS pretty cute. And I love details that make my things a little unusual and unique.

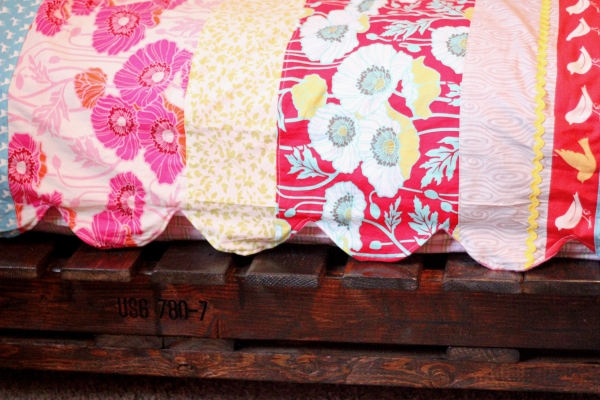
The two pallets together ended up being about 8 inches longer than a standard twin mattress. We like that extra wood at the end because she can use it as a little step up to her bed…if you were making your own pallet bed, you could always saw off that extra space or buy an extra long twin mattress if it bugged you :)

I love the way this turned out! I also love that we tackled making our own furniture together. It was a fun adventure that didn’t cost a ton of money… the bed itself only cost us $46 (the total cost of the pallets and the wheels) because we used stain and polyurethane we already had in our garage. It always pays to look around the garage and house before you start a project to see what you already have. I am constantly using scraps from my fabric stash or paint we already have purchased for other projects and it helps keep our costs low.
I hope you try this project for yourself! These would be great guest beds or could be altered a bit for outdoor furniture too! If we can do it – you can too!

(Print above bed is from Vol25 on Etsy)


Lori
/ December 29, 2012It looks so, so awesome. Now that you’ve got some free time on your hands come over and be my decorator! ;)
theklossners
/ December 29, 2012So awesome Em!
debi
/ December 30, 2012LOVE LOVE! You are SOOOOO talented! I LOVE your quilt for Poppy too! AMAZING! :) I’m sure she just loves it!
-debi
Hannah
/ February 5, 2013We are wanting to do this for our daughter, do you know size pallets you used?
embjones
/ February 5, 2013Hi! I just went and measured for ya! The pallets were each 42×42 inches…good luck!
vol25
/ April 12, 2013This turned out SOO cute, thank you so much for letting me know- I completely missed it!
loli
/ July 16, 2013love this. i looked at an ikea twin bed, im lookin to remodel my room, but my busget is tight. anyways, this is a project that fits my budget;) u have talent:p God Bless
Tiffany
/ July 24, 2013Hi! I was wondering what color stain you used.
embjones
/ July 24, 2013Hi! I don’t have the bucket anymore but I’m pretty sure it was called Dark Walnut. We got it at Home Depot. :) Hope that helps!!
Tiffany
/ July 26, 2013Thank you. :) I’m in LOVE with this pallet bed btw!
embjones
/ July 26, 2013Oh thank you!! We love it too…hope yours works out well for you too!
Jamie
/ July 31, 2013Hey Emily, I’m dreaming up a quilt for Q’s future big girl bed (bc it will likely take me a looong time) can you tell me what fabric you used for the back of the quilt and the dimensions? Thanks!
embjones
/ August 5, 2013Hi Jamie!!! With this quilt, P was still working on potty training so I had a feeling it would be in and out of the wash fairly regularly and because of that I wanted to be able to stick it in the dryer….so I didn’t use any quilting batting in the middle and just backed it with a soft flannel. It also gets really cold here so our girls use down comforters and the quilt functions more as a coverlet than providing a lot of warmth. But this technique would still work if you wanted to add batting. We are in the middle of a move right now so I’m not sure what the dimensions are but you can email me or FB me when you are getting down to buying the fabric for your quilt and I will look it up for you. P’s bed is not on a boxspring, it’s just the one mattress so I made the quilt to only have a little fold over. I didn’t want it hanging down below the wood of the pallets – if that makes sense ;) Hope that helps!!
Plain Pallets
/ January 2, 2014Wooden Pallets and Plastic Pallets in Melbourne are performance-wise perfect in the country.
how to ship a car
/ April 23, 2014I like what you guys are usually up too. This kind of clever work and reporting!
Keep up the wonderful works guys I’ve added you guys to our blogroll.
Samantha Davis-Jensen
/ July 12, 2014Someone stole your tutorial and put gibberish for words.
http://www.99pallets.com/pallet-beds/twin-pallet-bed-instructions/
diy gardening ideas
/ October 17, 2014Thhis should definitely be don if you have never landscaped before and is very important.
We show you how to create a longg trench in thee soil in which you can lay the
plant on its side, which is a perfect way to give thee plant what it needs to
grow and flourish. Once you know what needs your back yard
will be designed to fulfill, you can divide up thhe
space into different areas thhat can carry out those functions.
Elaina
/ May 3, 2015I wanted to let you know that a website calling its self “99 pallets” has taken your content and is using it. It is all of your pictures for this bed and most of your commentary with a few tweaks.
Mookie
/ May 13, 2015Im starting to make one my own. This is inspiring. Wish i can sort things out with my local home depot.